Overview
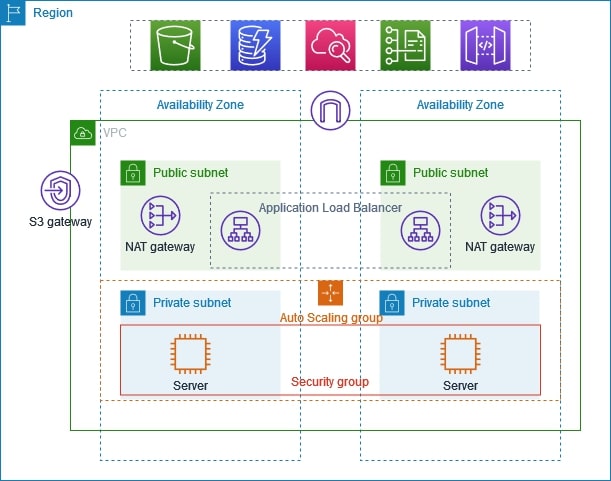
The VPC has public subnets and private subnets in two Availability Zones. Each public subnet contains a NAT gateway and a load balancer node. The servers run in the private subnets, are launched and terminated by using an Auto Scaling group, and receive traffic from the load balancer. The servers can connect to the internet by using the NAT gateway. The servers can connect to Amazon S3 by using a gateway VPC endpoint.
When you create this VPC by using the Amazon VPC console, we create a route table for the public subnets with local routes and routes to the internet gateway. We also create a route table for the private subnets with local routes, and routes to the NAT gateway, egress-only internet gateway, and gateway VPC endpoint.
- Create the VPC
Use the following procedure to create a VPC with a public subnet and a private subnet in two Availability Zones, and a NAT gateway in each Availability Zone.
To create the VPC Open the Amazon VPC console at https://console.aws.amazon.com/vpc/.
On the dashboard, choose Create VPC.
For Resources to create, choose VPC and more.
Configure the VPC
For Name tag auto-generation, enter a name for the VPC.
For IPv4 CIDR block, you can keep the default suggestion, or alternatively you can enter the CIDR block required by your application or network.
If your application communicates by using IPv6 addresses, choose IPv6 CIDR block, Amazon-provided IPv6 CIDR block.
Configure the subnets
For Number of Availability Zones, choose 2, so that you can launch instances in multiple Availability Zones to improve resiliency.
For Number of public subnets, choose 2.
For Number of private subnets, choose 2.
You can keep the default CIDR block for the public subnet, or alternatively you can expand Customize subnet CIDR blocks and enter a CIDR block. For more information, see Subnet CIDR blocks.
For NAT gateways, choose 1 per AZ to improve resiliency.
If your application communicates by using IPv6 addresses, for Egress only internet gateway, choose Yes.
For VPC endpoints, if your instances must access an S3 bucket, keep the S3 Gateway default. Otherwise, instances in your private subnet can’t access Amazon S3. There is no cost for this option, so you can keep the default if you might use an S3 bucket in the future. If you choose None, you can always add a gateway VPC endpoint later on.
For DNS options, clear Enable DNS hostnames.
Choose Create VPC.
- Deploy your application
Ideally, you’ve finished testing your servers in a development or test environment, and created the scripts or images that you’ll use to deploy your application in production.
You can use Amazon EC2 Auto Scaling to deploy servers in multiple Availability Zones and maintain the minimum server capacity required by your application.
To launch instances by using an Auto Scaling group Create a launch template to specify the configuration information needed to launch your EC2 instances by using Amazon EC2 Auto Scaling.
Create an Auto Scaling group, which is a collection of EC2 instances with a minimum, maximum, and desired size.
Create a load balancer, which distributes traffic evenly across the instances in your Auto Scaling group, and attach the load balancer to your Auto Scaling group.
- Test your configuration
After you’ve finished deploying your application, you can test it. If your application can’t send or receive the traffic that you expect, you can use Reachability Analyzer to help you troubleshoot. For example, Reachability Analyzer can identify configuration issues with your route tables or security groups.
- Clean up
When you are finished with this configuration, you can delete it. Before you can delete the VPC, you must delete the Auto Scaling group, terminate your instances, delete the NAT gateways, and delete the load balancer.